对于稠密的颗粒运动,Fluent除了可以利用欧拉和Mixture模型外,还提供了稠密离散相(DDPM)模型,不过这些模型均无法考虑颗粒间的摩擦力及接触力。DEM碰撞模型扩展了DPM模型的功能,能够考虑颗粒间的接触力与摩擦力,因此可用于非常稠密颗粒流动的模拟。该模型可以与DDPM(Dense DPM)模型何用以模拟颗粒对主相的阻碍作用,因此可以用于鼓泡流化床、提升管、气力输送系统以及泥浆流动。特别对于以下情况,DEM模型特别有用:
-
当颗粒粒径分布很广时
-
当计算网格相对粗糙时
本案例演示DDPM模型的使用,其中颗粒碰撞通过DEM模型来考虑。
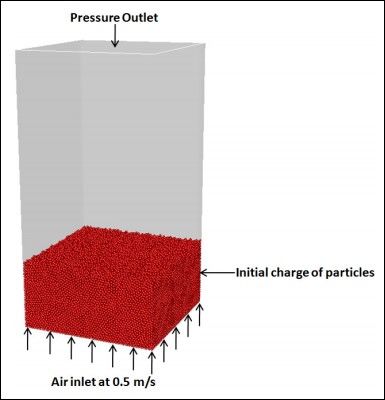
本例中,我们将会模拟模拟一个鼓泡流化床,并且决定其在给定表观速度情况下的工作行为。矩形床的尺寸为0.2m*0.2m*0.4m,初始情况下预装了部分颗粒,表观速度0.5m/s,检测穿过床层的压力降,示意图如下图所示。
对于经典的流化曲线,若流化床入口的表观速度较小,则流化床不会流化,其行为类似填充床,当速度增加时,流化床开始流化。
一种理解该现象的经典方法即为流化曲线,此时入口能够驱动流体的压力需求是表观速度的函数。当处于填充床工况时,压力与表观速度的增加成正比,然而,当初期流化条件达到后,压力始终保持某一恒定值(时间平均)。
在本例中,我们将对给定表观速度下的流化床流化过程进行仿真模拟。
-
文件准备:拷贝bed.msh、92Kparcels.inj及view-0.vw文件到工作目录(文件在文末的链接中)
-
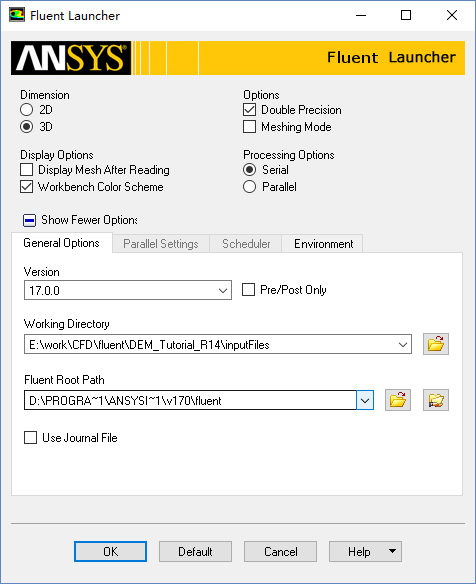
以3D模式、Double Precision开启FLUENT
-
利用菜单File | Read | Mesh…读入网格文件bed.msh
-
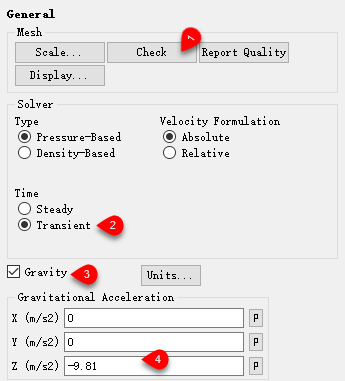
点击 右侧面板中的Check按钮,检查导入的网格,确保没有负体积的存在
-
激活Transient选项采用瞬态计算
-
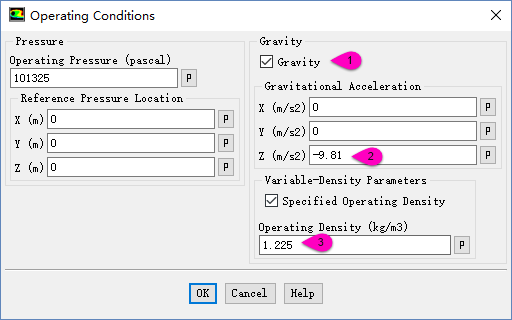
激活Gravity,设置重力加速度为Z方向-9.81 m/s2
-
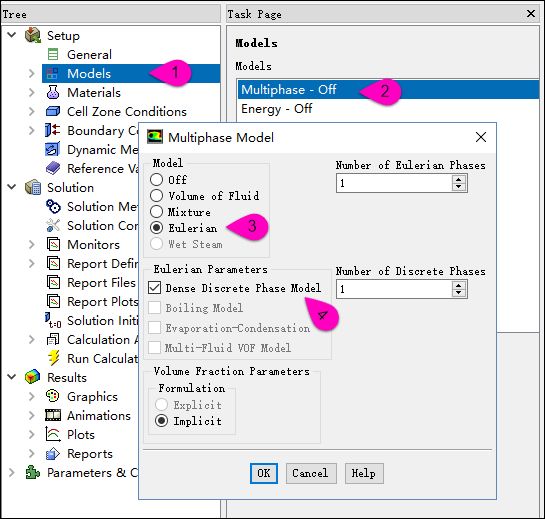
设置DDPM模型,按如下图所示进行设置
-
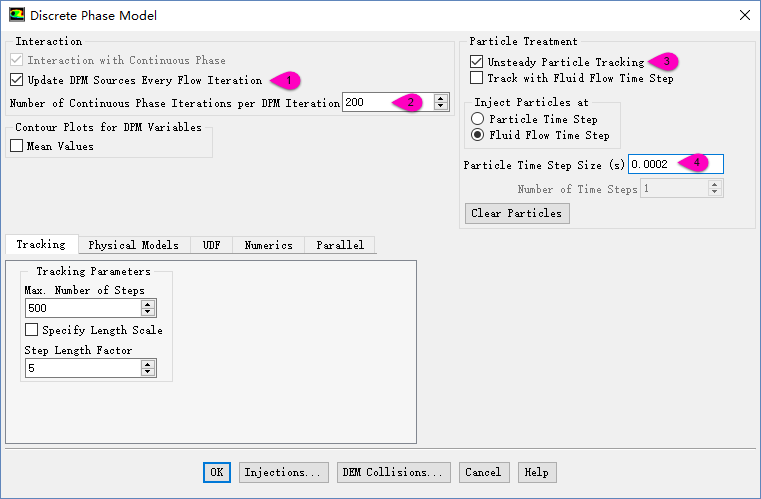
鼠标点击模型树节点Models,双击右侧models列表中的Discrete Phase
弹出如下图所示对话框,按图进行设置。
-
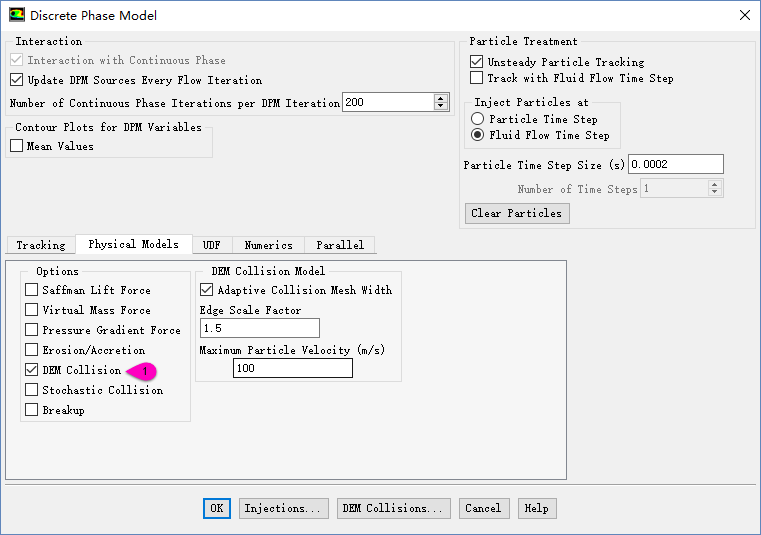
切换至Physical Models标签页,激活DEM Collision选项,如下图所示。
-
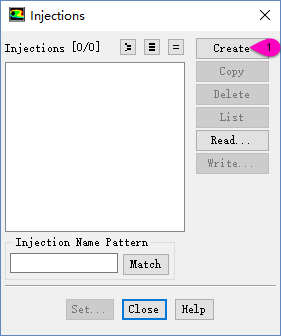
点击Discrete Phase Model对话框下方的Injections…按钮
-
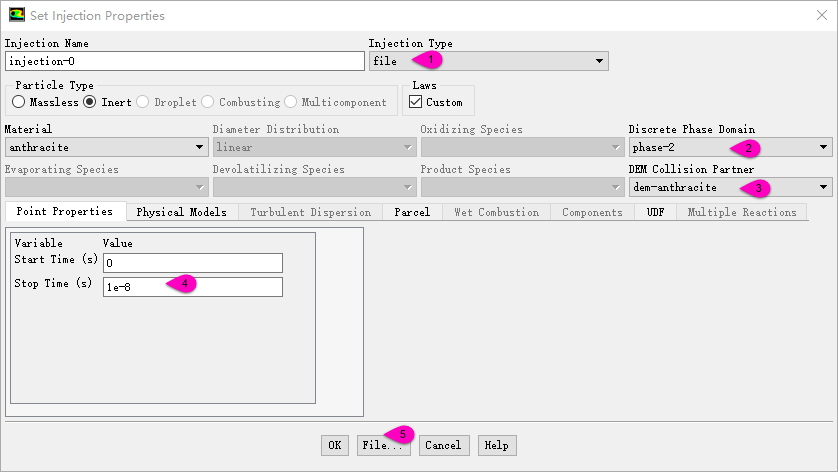
点击Create按钮,弹出set Injection Properties对话框。
-
选择Injection Type为file
-
选择Discrete Phase Domain为Phase-2
-
选择DEM Collision Partner为dem-anthracite
-
设置Stop Time为1e-8
-
点击File…按钮,在打开的文件选择对话框中选择文件92Kparcels.inj
-
切换至Physical Models标签页,设置Drag Law为Wen-Yu
-
点击OK按钮关闭对话框
-
返回至 Discrete Phase Model对话框。
-
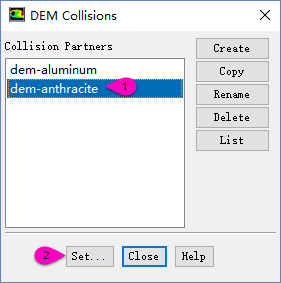
点击Discrete Phase Model对话框下方的DEM Collisions…按钮,弹出如下图所示对话框
-
选择dem-anthracite,点击set…按钮。
-
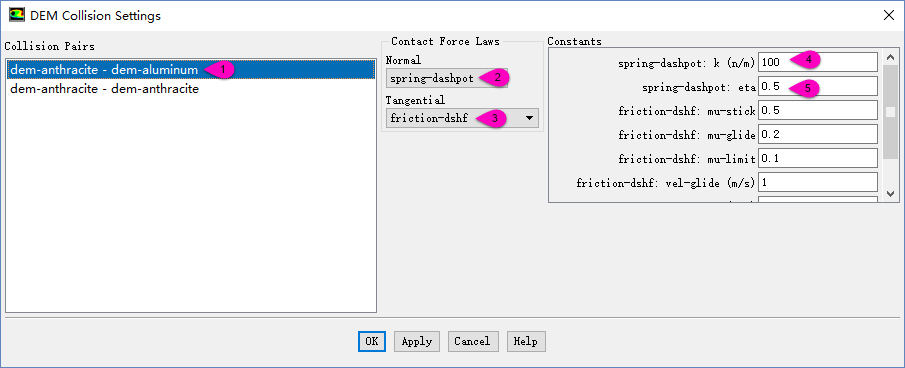
选择Collision Pairs列表项中的dem-anthracite-dem-aluminum,按下图所示进行设置
-
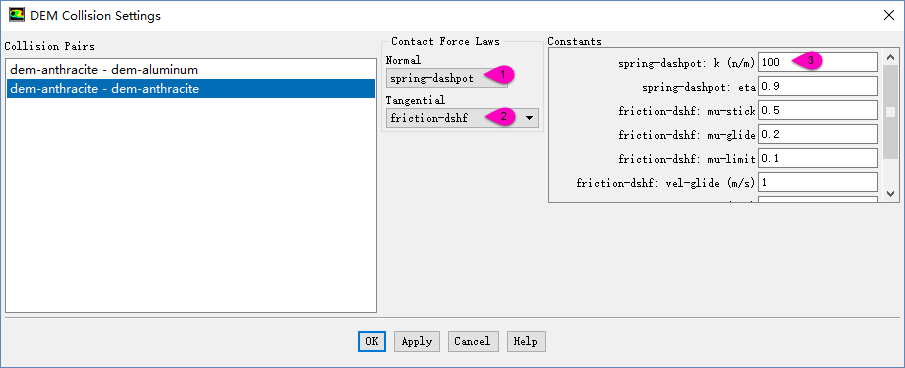
选择列表项中的dem-athracite - dem-anthracite,按下图所示设置。
-
点击OK按钮退出对话框。
-
点击模型树节点Cell Zone Conditions,在右侧面板中点击按钮Operating Conditions..,如下图所示。
-
选择模型树节点Boundary Conditions。
-
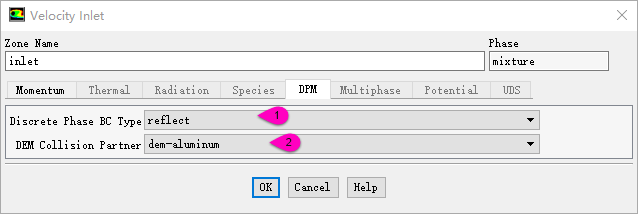
在右侧参数面板中,鼠标选择Zone列表框中选项inlet,确保Phase下拉框选择项为mixture,点击Edit…按钮弹出参数设置对话框,切换至DPM标签页,进行如下图所示设置。
-
关闭OK按钮关闭对话框,返回至边界条件设置面板。
-
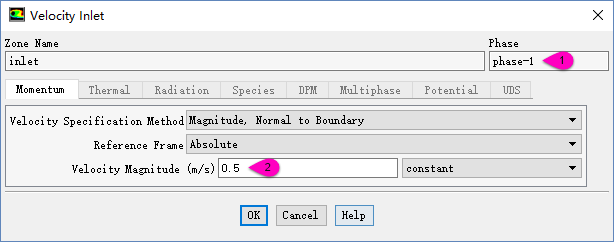
依然选择inlet,设置Phase下拉框内容为phase-1,点击Edit…按钮弹出参数设置对话框。设置Velocity Magnitude为0.5。点击OK按钮关闭对话框。
-
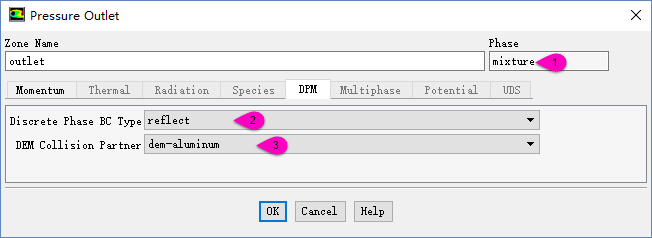
设置outlet边界,采用类似的方法,设置Mixture类型,进行如下图所示设置。
设置亚松弛因子:
-
Pressure: 0.9
-
Momentum: 0.2
-
Volume Fraction: 1
-
Discrete Phase Sources: 1
-
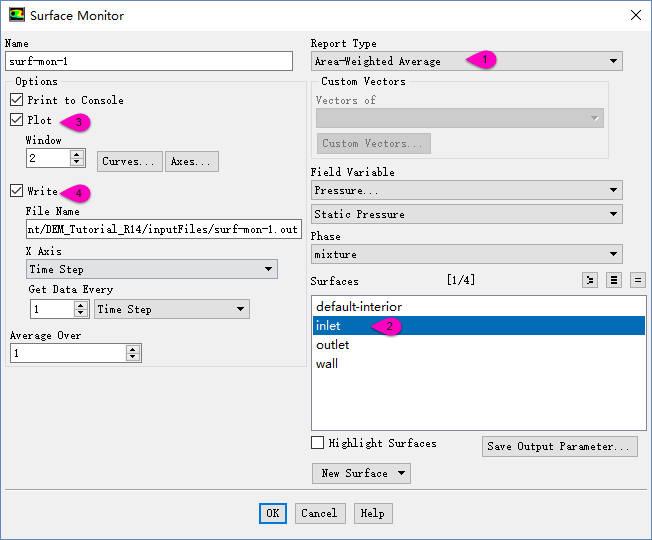
点击模型树节点Monitors,在 右侧面板中点击Surface Monitors下方的Create按钮,在弹出的对话框中按如图所示进行设置,点击OK按钮关闭对话框。
直接初始化即可。
-
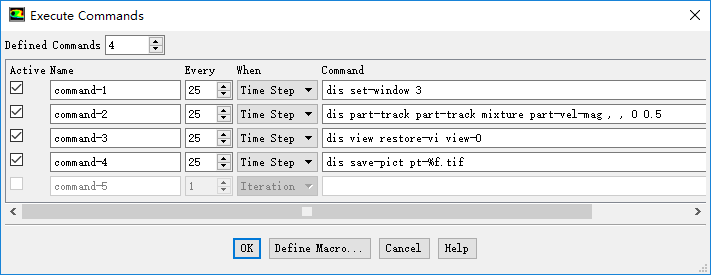
双击模型树节点Calculation Activities,弹出命令设置对话框
按如图所示定义4个图形输出命令
dis set-window 3
dis part-track part-track mixture part-vel-mag , , 0 0.5
dis view restore-vi view-0
dis save-pict pt-%f.tif
-
设置Time Step Size为0.001
-
设置Number of Time Steps为2000
-
设置Report Interval为5
-
点击Calculate
后处理同常规后处理,这里不详述。也可以导出颗粒数据到其他专用后处理软件中进行。
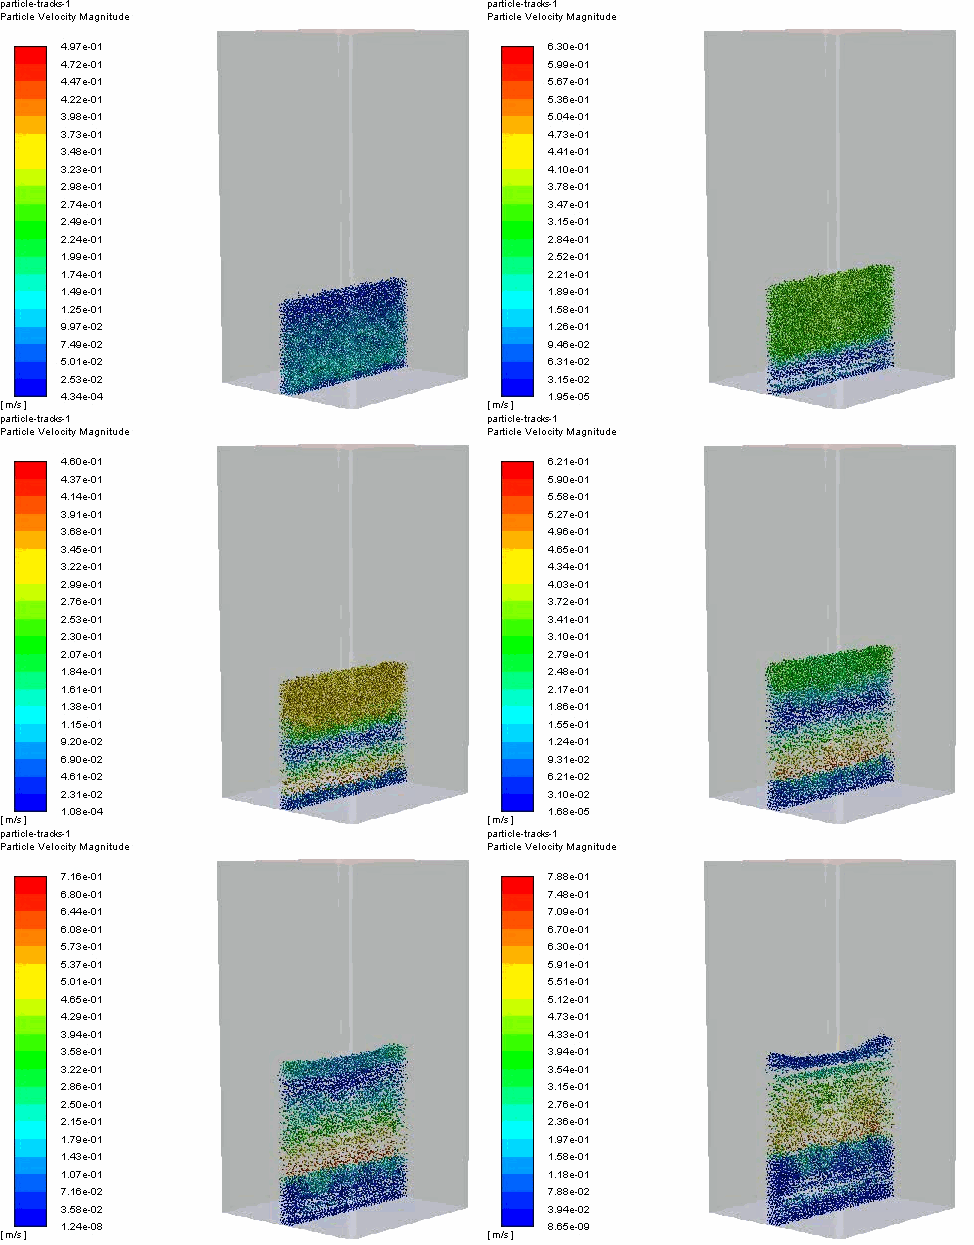
贴一段录制的GIF,数据量太大没办法只好删掉了其中的一些帧,看起来有点儿不连续。
图里头只是取了其中一小块区域方便查看,实际上是整体颗粒都在运动的。
https://pan.baidu.com/s/1dL4PaA 密码:3uun


本篇文章来源于微信公众号: CFD之道


评论前必须登录!
注册