前面提到用simpleFoam计算稳态湍流流动,可以使用pisoFoam及pimpleFoam计算瞬态湍流流动。
注:这几个求解器只是计算纯流动问题,若涉及到其他物理现象,则需要用其他求解器,或自己动手改造代码。
1 案例描述
本案例利用simpleFoam计算歧管内流体流动。
案例实体计算模型如下图所示,

-
在SCDM中进行清理并抽取流体区域,并进行边界命名,如下图所示(其他边界全部命名为walls)
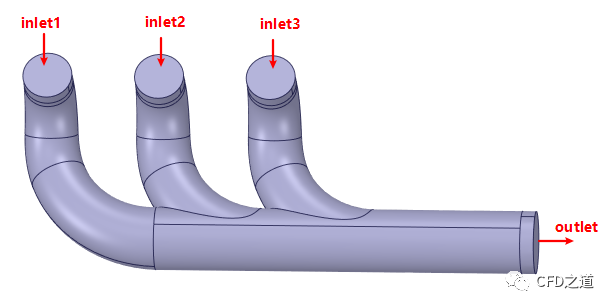
-
在Fluent Meshing中生成多面体网格,如下图所示
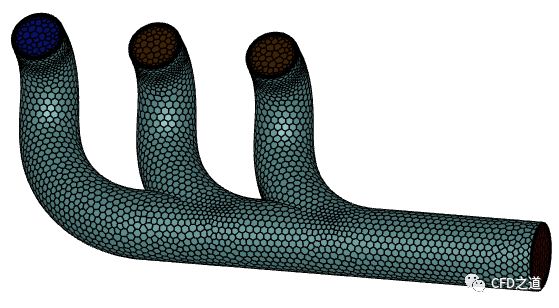
注:可以使用任何网格生成工具,推荐使用OpenFOAM自带工具snappyHexMesh生成网格。
-
导出msh格式计算网格
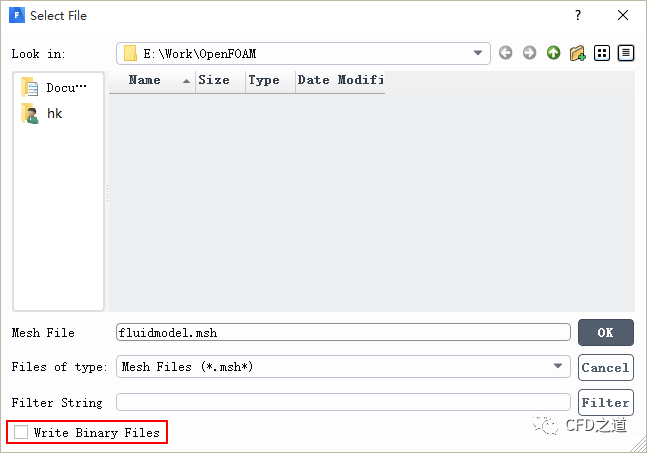
注:需要取消选项Write Binary Files导出ascii格式的网格文件,否则后面网格转换会出错。
2 OpenFOAM设置
2.1 网格转换
-
创建案例文件夹mainfold,将msh文件拷贝到当前文件夹中
cp -r $FOAM_TUTORIALS/incompressible/simpleFoam/pitzDaily .-
修改文件夹名称为mainfold
mv pitzDaily mainfold-
将前面生成的网格文件fluidmodel.msh拷贝到文件夹mainfold中

-
终端进入文件夹mainfold中,执行命令将网格转化为OpenFOAM能识别的格式
fluent3DMeshToFoam fluidmodel.msh注意:这里需要使用fluent3DMeshToFoam,使用前面提到的fluentMeshToFoam会出错。
转换成功后终端提示如下图所示。
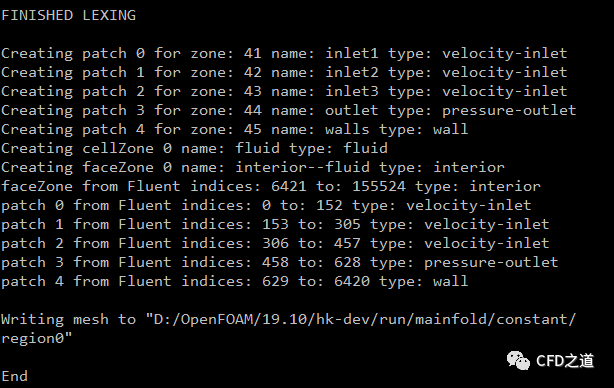
-
查看constant/polyMesh/boundary文件,检查边界名称及类型
FoamFile{version 2.0;format ascii;class polyBoundaryMesh;location "constant/polyMesh";object boundary;}5(inlet1{type patch;nFaces 153;startFace 149104;}inlet2{type patch;nFaces 153;startFace 149257;}inlet3{type patch;nFaces 152;startFace 149410;}outlet{type patch;nFaces 171;startFace 149562;}walls{type wall;inGroups 1(wall);nFaces 5792;startFace 149733;})
这里的边界名称及类型在Fluent Meshing中完全定义好了,所以不需要进行任何干涉。
2.2 constant文件准备
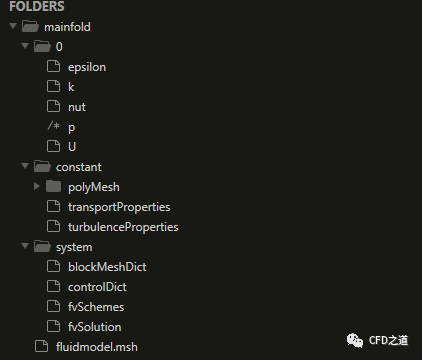
这里拷贝的是pitzDaily算例,该算例是一个湍流模型测试算例。本案例采用kEpsilon模型进行计算,可以先删除掉0文件夹中的一些计算中用不到的文件(仅需保留k、epsilon、nut、p及U文件即可)。文件组织结构如图所示。
1、constant/transportProperties文件
该文件中指定流体的运动粘度,本案例流体介质为空气,设置其运动粘度为1e-5 m2/s,文件内容如下。
FoamFile{version 2.0;format ascii;class dictionary;location "constant";object transportProperties;}transportModel Newtonian;nu [0 2 -1 0 0 0 0] 1e-05;
2、constant/turbulenceProperties文件
该文件中指定湍流模型。这里采用kEpsilon模型计算湍流,文件内容如下所示。
FoamFile{version 2.0;format ascii;class dictionary;location "constant";object turbulenceProperties;}simulationType RAS;RAS{RASModel kEpsilon;turbulence on;printCoeffs on;}
2.3 初始文件准备
1、p文件
该文件指定0时刻压力分布。
FoamFile{version 2.0;format ascii;class volScalarField;object p;}dimensions [0 2 -2 0 0 0 0];internalField uniform 0;boundaryField{inlet1{type zeroGradient;}inlet2{type zeroGradient;}inlet3{type zeroGradient;}outlet{type fixedValue;value uniform 0;}walls{type zeroGradient;}}
文件中指定了边界outlet出口压力为0 m2/s2,注意此处的压力量纲是Pa与kg/m3的比值。
2、0/U文件
该文件中指定速度分布。这里指定三个入口inlet1、inlet2及inlet3的速度为x轴负方向1 m/s。
FoamFile{version 2.0;format ascii;class volVectorField;object U;}dimensions [0 1 -1 0 0 0 0];internalField uniform (0 0 0);boundaryField{inlet1{type surfaceNormalFixedValue;refValue uniform 1;}inlet2{type fixedValue;value uniform (1 0 0);}inlet3{type fixedValue;value uniform (1 0 0);}outlet{type zeroGradient;}walls{type noSlip;}}
文件中指定inlet1入口速度为法向1m/s,inlet2与inlet3入口速度为x方向1 m/s,对于本案例来说,两种定义方式是等效的。
3、k文件
k文件设置各边界的湍动能。
FoamFile{version 2.0;format ascii;class volScalarField;location "0";object k;}dimensions [0 2 -2 0 0 0 0];internalField uniform 0.01;boundaryField{inlet1{type fixedValue;value uniform 0.05;}inlet2{type fixedValue;value uniform 0.05;}inlet3{type fixedValue;value uniform 0.05;}outlet{type zeroGradient;}walls{type kqRWallFunction;value $internalField;}}
4、epsilon文件
该文件设置各边界的湍流耗散率。
FoamFile{version 2.0;format ascii;class volScalarField;location "0";object epsilon;}dimensions [0 2 -3 0 0 0 0];internalField uniform 0.5;boundaryField{inlet1{type fixedValue;value $internalField;}inlet2{type fixedValue;value $internalField;}inlet3{type fixedValue;value $internalField;}outlet{type zeroGradient;}walls{type epsilonWallFunction;value $internalField;}}
5、nut文件
该文件指定湍流粘度比。
FoamFile{version 2.0;format ascii;class volScalarField;location "0";object nut;}dimensions [0 2 -1 0 0 0 0];internalField uniform 0;boundaryField{inlet1{type calculated;value uniform 0;}inlet2{type calculated;value uniform 0;}inlet3{type calculated;value uniform 0;}outlet{type calculated;value uniform 0;}walls{type nutkWallFunction;value uniform 0;}}
2.4 system文件准备
1、controlDict文件
指定求解控制文件。
FoamFile{version 2.0;format ascii;class dictionary;location "system";object controlDict;}application simpleFoam;startFrom startTime;startTime 0;stopAt endTime;endTime 1;deltaT 0.01;writeControl timeStep;writeInterval 20;purgeWrite 0;writeFormat ascii;writePrecision 6;writeCompression off;timeFormat general;timePrecision 6;runTimeModifiable true;functions{#includeFunc residuals}
这里指定计算时间为1 s,本案例为稳态计算,所以这里的1 s并不是真实的时间。指定了时间步长为0.01 s,因此实际上是指定了迭代次数100次。
2、fvSchemes文件
指定求解算法。
FoamFile{version 2.0;format ascii;class dictionary;location "system";object fvSchemes;}ddtSchemes{default steadyState;}gradSchemes{default Gauss linear;}divSchemes{default none;bounded Gauss linearUpwind grad(U);bounded Gauss limitedLinear 1;bounded Gauss limitedLinear 1;bounded Gauss limitedLinear 1;bounded Gauss limitedLinear 1;Gauss linear;Gauss linear;}laplacianSchemes{default Gauss linear corrected;}interpolationSchemes{default linear;}snGradSchemes{default corrected;}wallDist{method meshWave;}
关于求解算法,以后再说。
3、fvSolution文件
指定求解方法。
FoamFile{version 2.0;format ascii;class dictionary;location "system";object fvSolution;}solvers{p{solver GAMG;tolerance 1e-06;relTol 0.1;smoother GaussSeidel;}"(U|k|epsilon)"{solver smoothSolver;smoother symGaussSeidel;tolerance 1e-05;relTol 0.1;}}SIMPLE{nNonOrthogonalCorrectors 0;consistent yes;residualControl{p 1e-5;U 1e-5;1e-5;}}relaxationFactors{equations{U 0.9;0.9;}}
这里指定了p、U、k以及epsilon的残差为1e-5,当计算残差低于此值时结束计算。
2.5 开始计算
文件定义完毕后,即可运行命令simpleFoam执行计算。
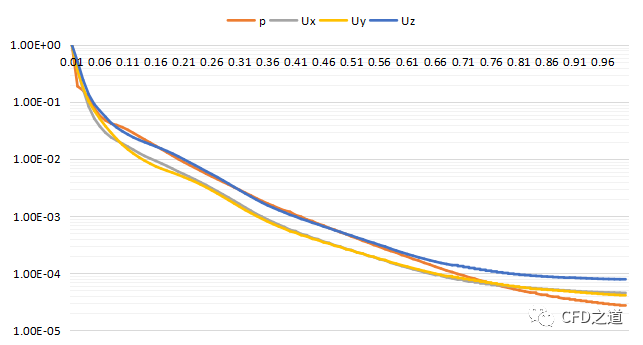
simpleFoam这里可以使用foamMonitor监测残差,只不过本机上gnuplot安装有问题,导致该命令无法使用。用excel绘制residuals.dat文件,如下图所示。
若对paraview不熟悉的话,可以利用foamToEnsight将结果数据转化为ensight格式,然后利用ensight进行后处理。
压力分布如图所示。
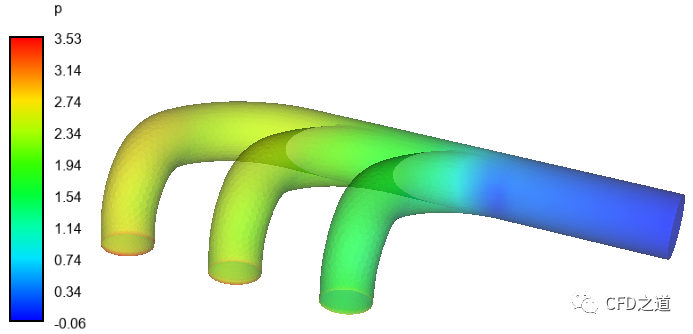
壁面上与三个入口相邻位置存在压力集中,需要进行处理,本文太长,以后再说怎么处理。
案例相关文件:
链接:
https://pan.baidu.com/s/1aEuY0kAXkL2agZpbRDMgjg
提取码:p3zk
本篇文章来源于微信公众号: CFD之道


评论前必须登录!
注册